Saturday, December 10, 2011

Silver Aluminum Christmas Tree


In the Charlie Brown Christmas special there is a scene where he is on the Christmas tree lot and he walks up to a bright shiny pink tree and knocks on it. The tree rings hollow and sounds like metal. To this Charlie Brown say's "Good grief."


Well I always thought that a metal Christmas tree could be quite beautiful if treated correctly. This year that is exactly what we decided to do in our apartment. Almost all the bulbs are glitter covered in shades of blue and Silver with hints of red. 


 I think overall it turned out to be not such a bad tree after all. And it really fits in for a New Years Eve party. If you are interested in getting a vintage aluminum tree like this I would suggest searching eBay

Tuesday, December 28, 2010

Displaying Nostalgic Houses and Shops by Hallmark part II


Here is another scene made using Hallmarks nostalgic houses and shops. This time its of a busy city right at Christmas time. Again I used HO scale figures and cars. I made the sidewalk out of cardboard cereal boxes and craft paper for the roads and crosswalk. When you get down and really look at it its like the camera technique tilt shift.


Here is what the whole set-up looks like from a distance, its only about 12 inches by 19 inches. 


The next set of pictures is from the Hallmark pressed tin houses. They are about the same size so the same scale figures worked. I made a hillside for the farm using Styrofoam. 


And finally a couple shots from the first scene of houses I made. 


Monday, December 27, 2010

Moms Christmas cookies


This year mom went all out and made some really amazing Christmas cookies. On top of that she found these great boxes by, who else, Martha Stewart to put them in. Here is a link to the boxes we chose: Elegant Match Box.  It was really a great looking gift and there was plenty left over for snacking. 


Star Wars holiday cookies


For Christmas this year I wanted to make Star Wars cookies for my friends, I had decided on this a couple months ago when Williams-Sonoma put out a Heroes & Villains cookie cutter set that I had to get. It comes with molds for Darth Vader, Yoda, Boba Fett, and a Stormtrooper. Here is a link to the product: star-wars-cookie-cutter.


I started with a basic sugar cookie recipe and tried several different decorating techniques.  The picture on the right is of the "work station" I set up. Its amazing how many different types of colored sugar collects in your kitchen cupboard over the years. I didn't have to buy a single thing. 

It took a couple days but I eventually completed over 100 Star Wars cookies. The favorite of the family is the stormtrooper with the holly and ivy on the helmet. 

Here are some pics of the variations: 
Stormtrooper
Boba/Jango Fett


Darth Vader
Yoda


Overall I am really satisfied with how these guys turned out. 

Sunday, December 26, 2010

Our Christmas tree


So I know everyone is proud of their Christmas tree creations and our family is no different.  This year we tried something different going for a all red and white decorated tree. We also tried using fake snow on the branches. This is the final result. 

photo from PotteryBarn.com
We got this ambitious drive for a new tree design from a picture in Pottery Barns Winter catalog. This is the picture up above. As you can see they went with an all white color scheme that was just too plain for me. But we stayed true to the overall idea. The overall design is tied together with three things; 
  •  the snow on the branches,
  •  the icicles at every tip, 
  • and the color pallet.  
The icicles were surprisingly hard to find. I thought that they were made in abundance at all dollar stores, boy was I wrong. The only place I found them was at Bronners, the Christmas Super Store. Here is a link to the icicles. The fake snow was much easier to get, I got mine at JoAnn Fabrics. Its made of polyester fiberfill, it's flame retardant and comes in a natural tight woven blanket so you can cut it up into pieces. 


The angel we use on top is a family tradition. My brother won it  in a raffle at a craft show about a decade ago.  And ever since its been on the top of our tree.


Red and Gold classic Christmas


This is the Christmas display made for the entryway of our house. I wanted to do something that looked classically rich and deep, like a Christmas display at Marshal Fields. The fact that the table is red was the perfect jumping off point, it's from Pottery Barn and is called the leena media console


Most of the reindeer have been collected over the years from Target. The beautiful red bulb tower was from Pier 1. The mini bulbs in the votives and the kerosene lamps are from Pottery Barn.  The giant decorative bulbs are actually plastic and meant to be outdoors.


The combination of these elements comes together quite well and are tied together with red Christmas lights at the base.


Saturday, December 4, 2010

Displaying Nostalgic Houses and Shops by Hallmark

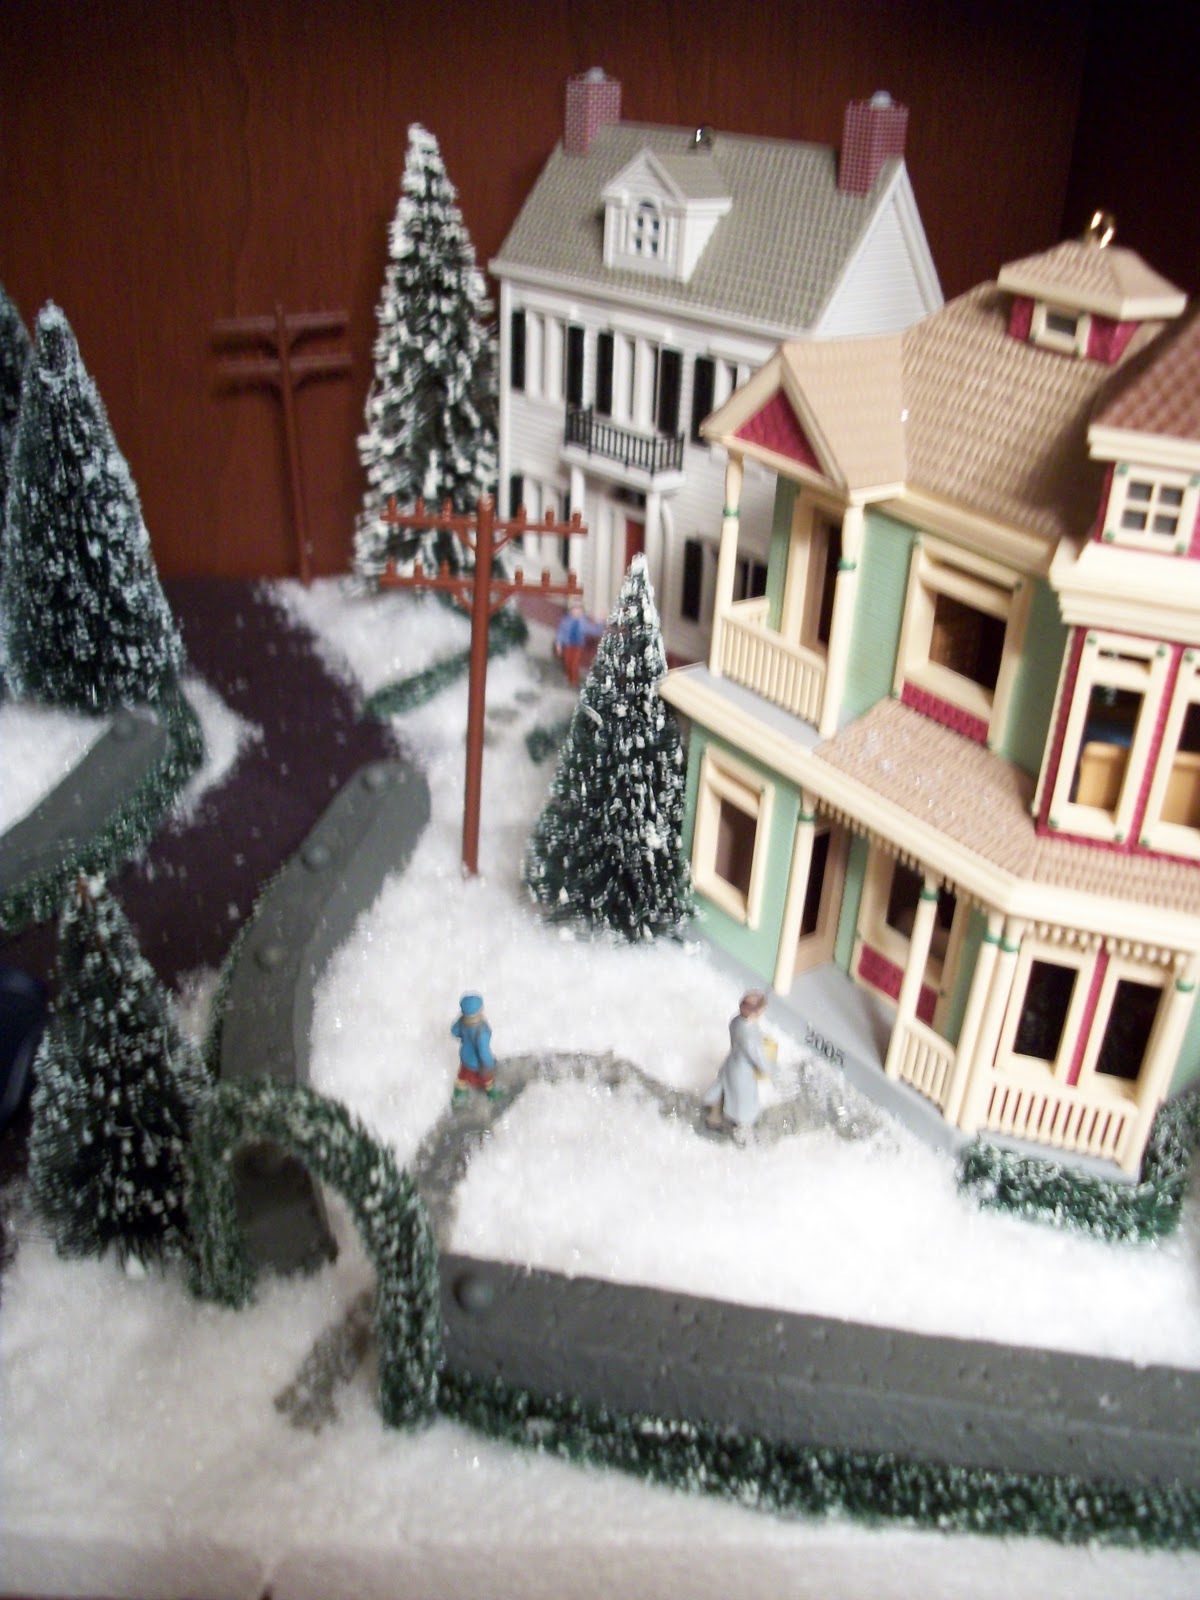
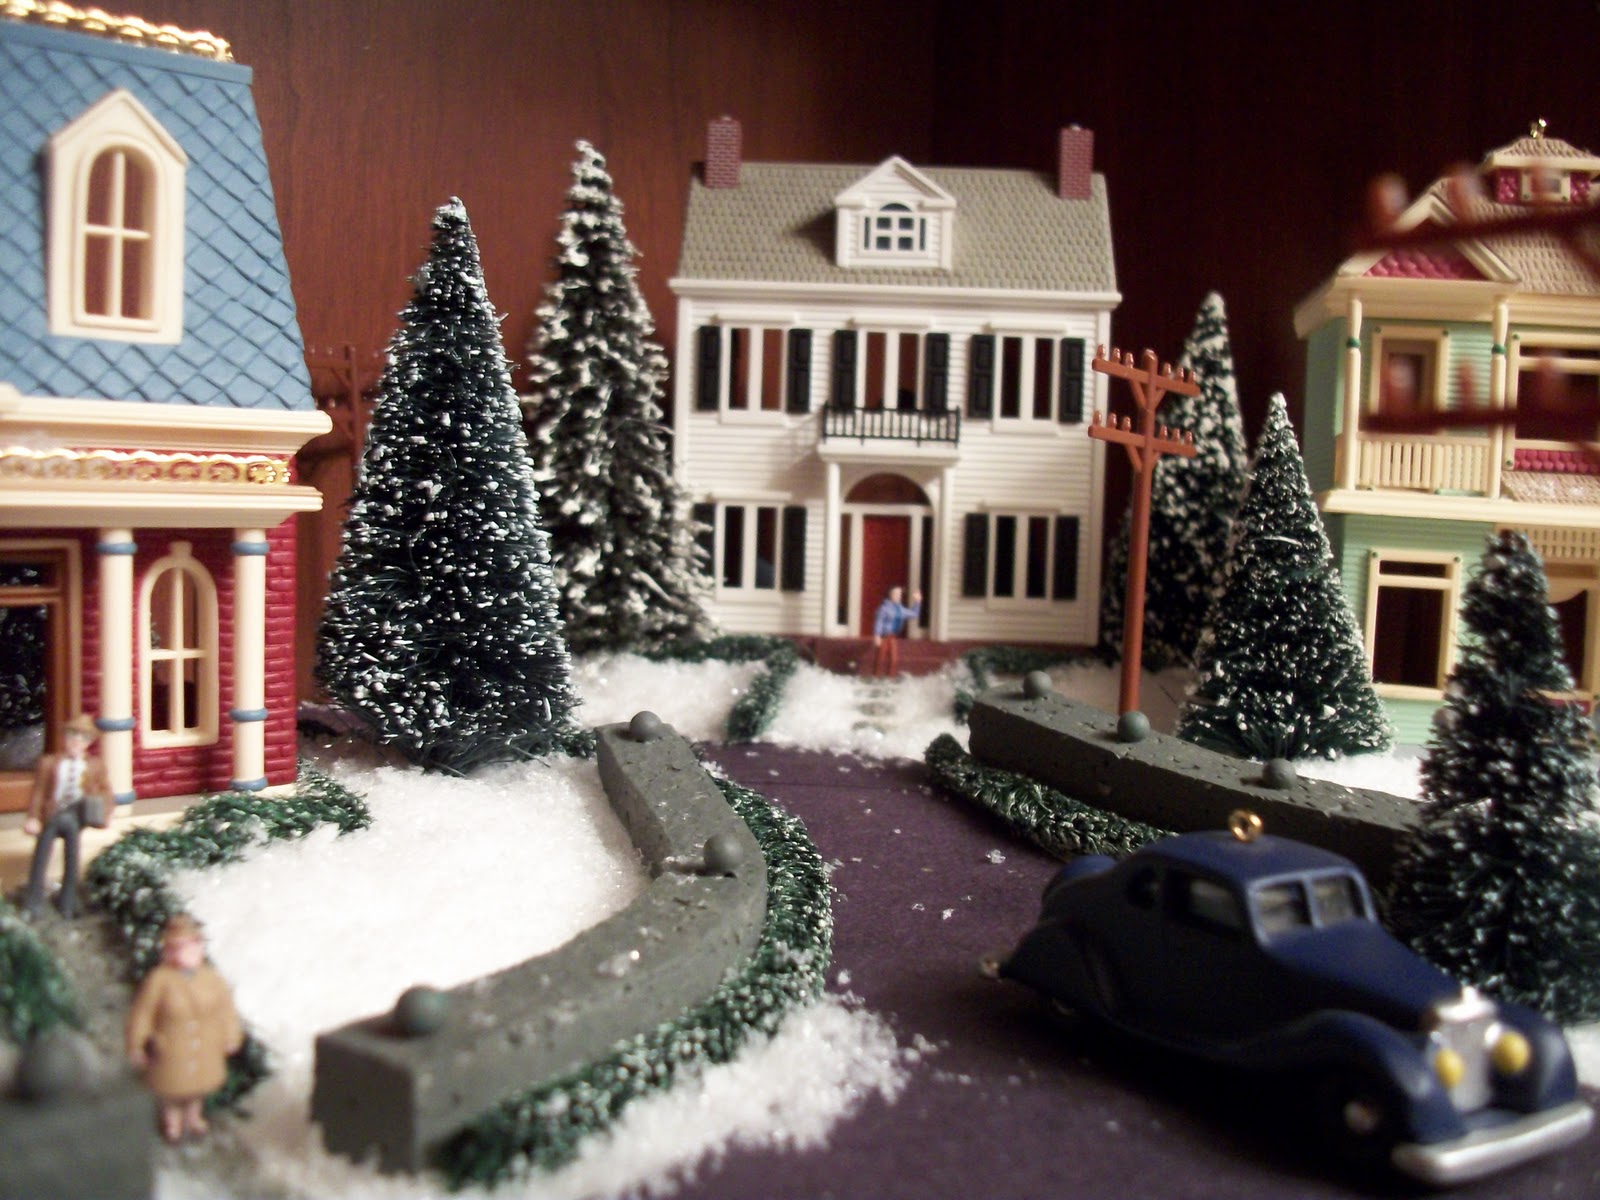
This looks like a festive picture taken of a 1970's nostalgic neighborhood right?  Well you would be partially right if you thought this, the scene you see is actually houses from the Hallmark Nostalgic Houses and Shops line of ornaments. And are only about 4 inches tall!
You see, our family has been collecting the Nostalgic houses since the 80's when they were first available. And for whatever reason I really like decorating these into great looking scenes. Hallmark has never made individual figures or cars available for this line but they designed them to the same scale as HO train sets. So with a little digging I found www.woodlandscenics.com which is a company that makes pre-painted figures that fit perfectly to the line.  
This is the first of a couple scenes I'm going to make and I thought I'd share a brief tutorial on how I like to display these nostalgic houses. 

STEP 1:
Styrofoam board layers and road. 
So first you need some Styrofoam board. This is not that hard to find for free. Its in boxes all over the place. The best stuff to find is thin sheets so you can add layers instead of carving it down. When placing the sheets you want to have layers to add visual interest. Make the buildings on the top of hills with front yards. If you look at my picture I made the building in the back on the largest hill. I sloped the sides using a box cutter blade to give them a gentle curve instead of jagged cliffs. 
The road you see is simply black construction paper that I cut to fit the scene. You don't have to worry about being too exact because you will cover the edges with fake snow, this makes everything look more realistic. I outlined the front yards of my houses with thin cut pieces of Styrofoam held in with sewing needles.Those circular pin heads will become the column toppers on the brick walls.
All of this was held together with hot glue. 

STEP 2:
Place your houses.
Place your houses wherever you want them, place them so it looks like a natural neighborhood. One thing I might have done differently was to put a house with the back facing the road so people could see the inside details of one of the houses, but this is all I had to work with. Also think about how many accessories you want, will it be a busy road or an empty one? 

STEP 3:
Details, details, details. 
Nothing sells a miniature diorama like this more than details. You can never have enough. I decided to add a whole bunch of shrubbery for an old classic looking neighborhood. This was achieved by using Department 56 garland and bows which you can purchase here: Dept 56 garland & bows  . I cut up the pieces using a wire cutter and hot glued them into place. I also painted the brick walls and the pathways to the houses. Each path can be different, some could even be now covered. The paint if you were wondering is a simple acrylic that you can buy at any Jo-Ann Fabric's or Micheal's.  
The telephone lines are from a local Train Hobby shop, you can find these online, they are for HO scale train sets. 

STEP 4:
Put it all together. Finishing touches.
After everything is hot glued and dried it is time to put the houses into place. Next it is time to cover the scene with snow. It is important to use fresh fallen snow because the crystals are smaller and it looks far more realistic than other snow. I usually put it on using a spoon for better control. Make sure to put it everywhere, it really makes the scene. 
Now you can place trees all over the scene. It is important to use trees that are true to size with the buildings. You can find trees that will work at most places that have cheap porcelain buildings for sale during the holidays. I'd suggest Jo-Ann Fabrics or K-Mart. You will only need the smallest trees. As you can see from my pics, don't be afraid to use a lot of them. 
For a finishing touch I added the figures I mentioned I found at the beginning of the post. There are a lot to choose from. I would suggest snowball fight and general public .  Also the cars are from the same site. There is quite a bit to choose from. Also, I held them all in place using tacky wax, it seems to work quite well, is really cheap, and promises to wipe clean. 

And there you have it, a great looking display! 

Here are a couple more pictures of my first display for you to enjoy. I should have a City and farm one in a couple days. 


Please if you try my advice send me some pictures of your results, I'd love to see them.